Build A Drawing App in HTML CSS & JavaScript
by Letscode - October 4,2023
If you’ve done some beginner-level JavaScript projects and looking for an intermediate project, you can build this Drawing App that is based on HTML 5 canvas. But if you’re an absolute beginner, before building this app, I’d suggest you create some beginner-level projects from the 10 Best Beginners JavaScript Projects List.
Today in this blog, you’ll learn how to Build A Drawing or Paint App in HTML CSS & JavaScript. But before starting this project, if you haven’t seen my previous blog on Basic Image Editor in JavaScript. You can go and watch this project because many viewers have liked it and I believe you’ll like it too. Let’s back to this topic.
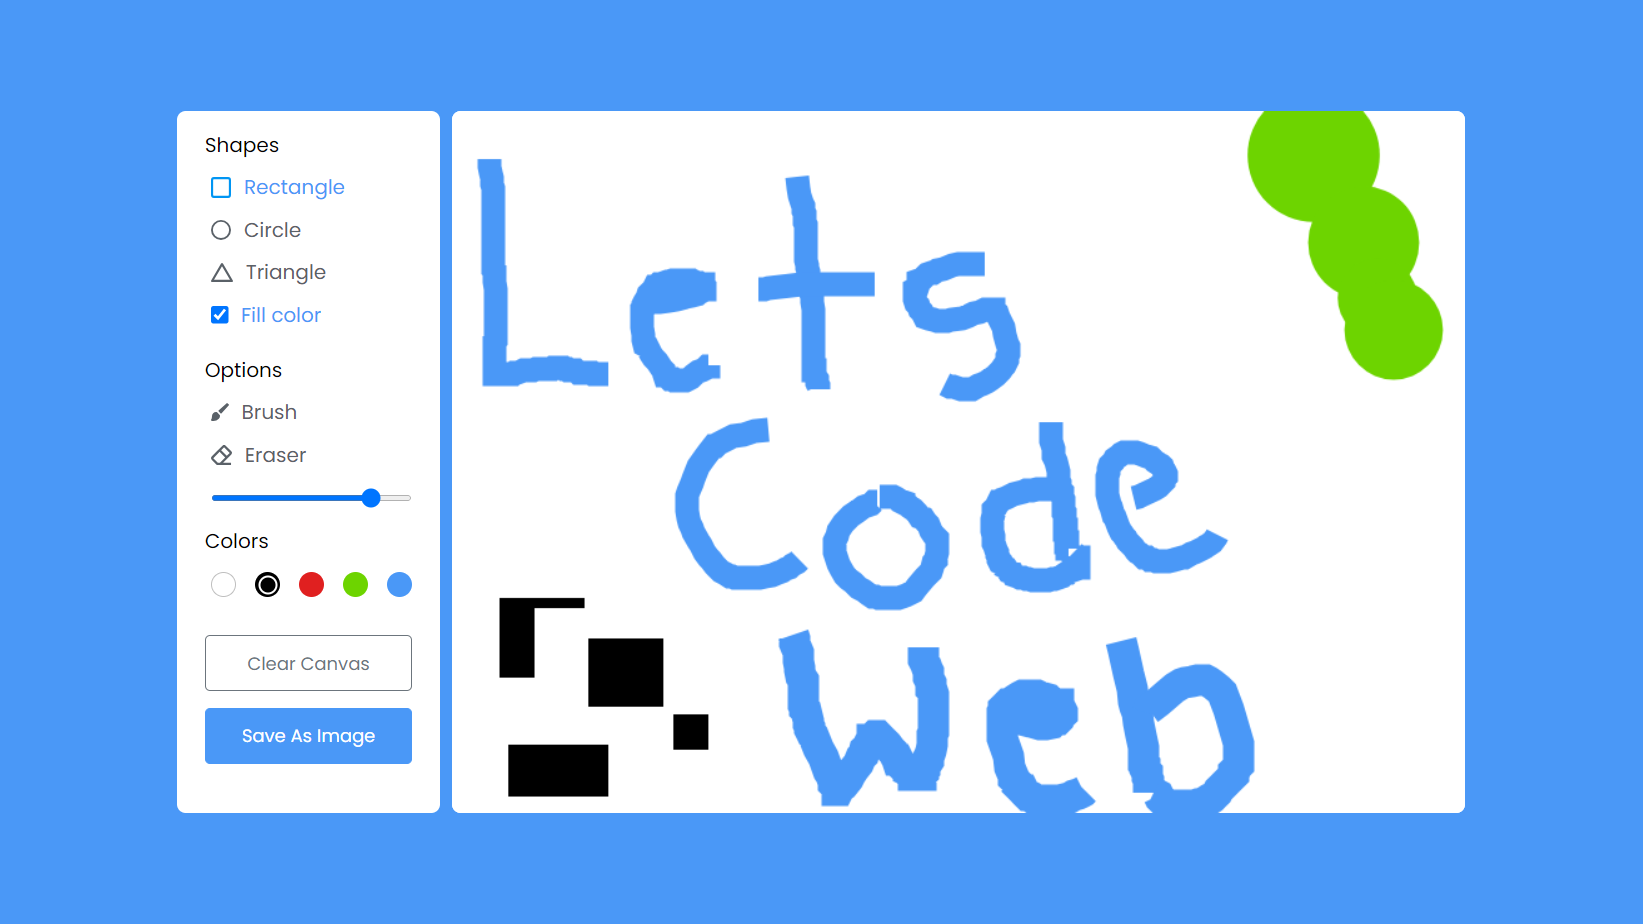
In this drawing app, users can draw different shapes like rectangles, circles, and triangles in their preferred colors. They can also erase or download their drawing as an image. All these functionalities are done with HTML 5 canvas & vanilla JavaScript, no external framework or library is used.
Drawing or Paint App JavaScript [Source Codes]
To build a Drawing App using HTML CSS & JavaScript, follow the given steps line by line:
- Create a folder. You can put any name of this folder and create the below-mentioned files inside this folder.
- Create a index.html file. File name must be index and its extension .html
- Create a style.css file. File name must be style and its extension .css
- Create a script.js file. File name must be script and its extension .js
- Download the icons folder from the Google Drive and put it inside the project folder.This folder contains SVG images that are used as icons on the drawing app.
Once you create these files, paste the given codes into the specified files. If you don’t want to do these then scroll down and download the source codes of this Drawing App by clicking on the given download button.
<!DOCTYPE html>
<!-- Coding By CodingNepal - youtube.com/codingnepal -->
<html lang="en" dir="ltr">

<head>
    <meta charset="utf-8">
    <title>Drawing App JavaScript | CodingNepal</title>
    <link rel="stylesheet" href="style.css">
    <meta name="viewport" content="width=device-width, initial-scale=1.0">
    <script src="script.js" defer></script>
</head>

<body>
    <div class="container">
        <section class="tools-board">
            <div class="row">
                <label class="title">Shapes</label>
                <ul class="options">
                    <li class="option tool" id="rectangle">
                        <img src="icons/rectangle.svg" alt="">
                        <span>Rectangle</span>
                    </li>
                    <li class="option tool" id="circle">
                        <img src="icons/circle.svg" alt="">
                        <span>Circle</span>
                    </li>
                    <li class="option tool" id="triangle">
                        <img src="icons/triangle.svg" alt="">
                        <span>Triangle</span>
                    </li>
                    <li class="option">
                        <input type="checkbox" id="fill-color">
                        <label for="fill-color">Fill color</label>
                    </li>
                </ul>
            </div>
            <div class="row">
                <label class="title">Options</label>
                <ul class="options">
                    <li class="option active tool" id="brush">
                        <img src="icons/brush.svg" alt="">
                        <span>Brush</span>
                    </li>
                    <li class="option tool" id="eraser">
                        <img src="icons/eraser.svg" alt="">
                        <span>Eraser</span>
                    </li>
                    <li class="option">
                        <input type="range" id="size-slider" min="1" max="30" value="5">
                    </li>
                </ul>
            </div>
            <div class="row colors">
                <label class="title">Colors</label>
                <ul class="options">
                    <li class="option"></li>
                    <li class="option selected"></li>
                    <li class="option"></li>
                    <li class="option"></li>
                    <li class="option">
                        <input type="color" id="color-picker" value="#4A98F7">
                    </li>
                </ul>
            </div>
            <div class="row buttons">
                <button class="clear-canvas">Clear Canvas</button>
                <button class="save-img">Save As Image</button>
            </div>
        </section>
        <section class="drawing-board">
            <canvas></canvas>
        </section>
    </div>

</body>

</html>
Second, paste the following codes into your style.css file.
/* Import Google font - Poppins */
@import url('https://fonts.googleapis.com/css2?family=Poppins:wght@400;500;600&display=swap');
*{
margin: 0;
padding: 0;
box-sizing: border-box;
font-family: 'Poppins', sans-serif;
}
body{
display: flex;
align-items: center;
justify-content: center;
min-height: 100vh;
background: #4A98F7;
}
.container{
display: flex;
width: 100%;
gap: 10px;
padding: 10px;
max-width: 1050px;
}
section{
background: #fff;
border-radius: 7px;
}
.tools-board{
width: 210px;
padding: 15px 22px 0;
}
.tools-board .row{
margin-bottom: 20px;
}
.row .options{
list-style: none;
margin: 10px 0 0 5px;
}
.row .options .option{
display: flex;
cursor: pointer;
align-items: center;
margin-bottom: 10px;
}
.option:is(:hover, .active) img{
filter: invert(17%) sepia(90%) saturate(3000%) hue-rotate(900deg) brightness(100%) contrast(100%);
}
.option :where(span, label){
color: #5A6168;
cursor: pointer;
padding-left: 10px;
}
.option:is(:hover, .active) :where(span, label){
color: #4A98F7;
}
.option #fill-color{
cursor: pointer;
height: 14px;
width: 14px;
}
#fill-color:checked ~ label{
color: #4A98F7;
}
.option #size-slider{
width: 100%;
height: 5px;
margin-top: 10px;
}
.colors .options{
display: flex;
justify-content: space-between;
}
.colors .option{
height: 20px;
width: 20px;
border-radius: 50%;
margin-top: 3px;
position: relative;
}
.colors .option:nth-child(1){
background-color: #fff;
border: 1px solid #bfbfbf;
}
.colors .option:nth-child(2){
background-color: #000;
}
.colors .option:nth-child(3){
background-color: #E02020;
}
.colors .option:nth-child(4){
background-color: #6DD400;
}
.colors .option:nth-child(5){
background-color: #4A98F7;
}
.colors .option.selected::before{
position: absolute;
content: "";
top: 50%;
left: 50%;
height: 12px;
width: 12px;
background: inherit;
border-radius: inherit;
border: 2px solid #fff;
transform: translate(-50%, -50%);
}
.colors .option:first-child.selected::before{
border-color: #ccc;
}
.option #color-picker{
opacity: 0;
cursor: pointer;
}
.buttons button{
width: 100%;
color: #fff;
border: none;
outline: none;
padding: 11px 0;
font-size: 0.9rem;
margin-bottom: 13px;
background: none;
border-radius: 4px;
cursor: pointer;
}
.buttons .clear-canvas{
color: #6C757D;
border: 1px solid #6C757D;
transition: all 0.3s ease;
}
.clear-canvas:hover{
color: #fff;
background: #6C757D;
}
.buttons .save-img{
background: #4A98F7;
border: 1px solid #4A98F7;
}
.drawing-board{
flex: 1;
overflow: hidden;
}
.drawing-board canvas{
width: 100%;
height: 100%;
}
Third, paste the following codes into your script.js file.
const canvas = document.querySelector("canvas"),
toolBtns = document.querySelectorAll(".tool"),
fillColor = document.querySelector("#fill-color"),
sizeSlider = document.querySelector("#size-slider"),
colorBtns = document.querySelectorAll(".colors .option"),
colorPicker = document.querySelector("#color-picker"),
clearCanvas = document.querySelector(".clear-canvas"),
saveImg = document.querySelector(".save-img"),
ctx = canvas.getContext("2d");

// global variables with default value
let prevMouseX, prevMouseY, snapshot,
isDrawing = false,
selectedTool = "brush",
brushWidth = 5,
selectedColor = "#000";

const setCanvasBackground = () => {
    // setting whole canvas background to white, so the downloaded img background will be white
    ctx.fillStyle = "#fff";
    ctx.fillRect(0, 0, canvas.width, canvas.height);
    ctx.fillStyle = selectedColor; // setting fillstyle back to the selectedColor, it'll be the brush color
}

window.addEventListener("load", () => {
    // setting canvas width/height.. offsetwidth/height returns viewable width/height of an element
    canvas.width = canvas.offsetWidth;
    canvas.height = canvas.offsetHeight;
    setCanvasBackground();
});

const drawRect = (e) => {
    // if fillColor isn't checked draw a rect with border else draw rect with background
    if(!fillColor.checked) {
        // creating circle according to the mouse pointer
        return ctx.strokeRect(e.offsetX, e.offsetY, prevMouseX - e.offsetX, prevMouseY - e.offsetY);
    }
    ctx.fillRect(e.offsetX, e.offsetY, prevMouseX - e.offsetX, prevMouseY - e.offsetY);
}

const drawCircle = (e) => {
    ctx.beginPath(); // creating new path to draw circle
    // getting radius for circle according to the mouse pointer
    let radius = Math.sqrt(Math.pow((prevMouseX - e.offsetX), 2) + Math.pow((prevMouseY - e.offsetY), 2));
    ctx.arc(prevMouseX, prevMouseY, radius, 0, 2 * Math.PI); // creating circle according to the mouse pointer
    fillColor.checked ? ctx.fill() : ctx.stroke(); // if fillColor is checked fill circle else draw border circle
}

const drawTriangle = (e) => {
    ctx.beginPath(); // creating new path to draw circle
    ctx.moveTo(prevMouseX, prevMouseY); // moving triangle to the mouse pointer
    ctx.lineTo(e.offsetX, e.offsetY); // creating first line according to the mouse pointer
    ctx.lineTo(prevMouseX * 2 - e.offsetX, e.offsetY); // creating bottom line of triangle
    ctx.closePath(); // closing path of a triangle so the third line draw automatically
    fillColor.checked ? ctx.fill() : ctx.stroke(); // if fillColor is checked fill triangle else draw border
}

const startDraw = (e) => {
    isDrawing = true;
    prevMouseX = e.offsetX; // passing current mouseX position as prevMouseX value
    prevMouseY = e.offsetY; // passing current mouseY position as prevMouseY value
    ctx.beginPath(); // creating new path to draw
    ctx.lineWidth = brushWidth; // passing brushSize as line width
    ctx.strokeStyle = selectedColor; // passing selectedColor as stroke style
    ctx.fillStyle = selectedColor; // passing selectedColor as fill style
    // copying canvas data & passing as snapshot value.. this avoids dragging the image
    snapshot = ctx.getImageData(0, 0, canvas.width, canvas.height);
}

const drawing = (e) => {
    if(!isDrawing) return; // if isDrawing is false return from here
    ctx.putImageData(snapshot, 0, 0); // adding copied canvas data on to this canvas

    if(selectedTool === "brush" || selectedTool === "eraser") {
        // if selected tool is eraser then set strokeStyle to white
        // to paint white color on to the existing canvas content else set the stroke color to selected color
        ctx.strokeStyle = selectedTool === "eraser" ? "#fff" : selectedColor;
        ctx.lineTo(e.offsetX, e.offsetY); // creating line according to the mouse pointer
        ctx.stroke(); // drawing/filling line with color
    } else if(selectedTool === "rectangle"){
        drawRect(e);
    } else if(selectedTool === "circle"){
        drawCircle(e);
    } else {
        drawTriangle(e);
    }
}

toolBtns.forEach(btn => {
    btn.addEventListener("click", () => { // adding click event to all tool option
        // removing active class from the previous option and adding on current clicked option
        document.querySelector(".options .active").classList.remove("active");
        btn.classList.add("active");
        selectedTool = btn.id;
    });
});

sizeSlider.addEventListener("change", () => brushWidth = sizeSlider.value);

colorBtns.forEach(btn => {
    btn.addEventListener("click", () => {
        document.querySelector(".options .selected").classList.remove("selected");
        btn.classList.add("selected");
        selectedColor = window.getComputedStyle(btn).getPropertyValue("background-color");
    });
});

colorPicker.addEventListener("change", () => {
    colorPicker.parentElement.style.background = colorPicker.value;
    colorPicker.parentElement.click();
});

clearCanvas.addEventListener("click", () => {
    ctx.clearRect(0, 0, canvas.width, canvas.height); // clearing whole canvas
    setCanvasBackground();
});

saveImg.addEventListener("click", () => {
    const link = document.createElement("a");
    link.download = `${Date.now()}.jpg`;
    link.href = canvas.toDataURL();
    link.click(); // clicking link to download image
});

canvas.addEventListener("mousedown", startDraw);
canvas.addEventListener("mousemove", drawing);
canvas.addEventListener("mouseup", () => isDrawing = false);
That’s all, now you’ve successfully built a Drawing or Paint App in HTML CSS & JavaScript. If your code doesn’t work or you’ve faced any problems, please download the source code files from the given download button. It is free and a zip file will be downloaded that contains the project folder with source code files.

Most Popular


Recent Posts
-

Image Slider in HTML CSS and JavaScript
Letscode - October 4,2023
-

Facebook Login Page Using HTML & CSS
Letscode - October 10,2023
-

Amazon Website clone in HTML & CSS
Letscode - November 4,2023
-

Custom Captcha Generator in HTML CSS and JS
Letscode - October 24,2023