Confirm Password Validation in HTML CSS & JavaScript
by Letscode - October 4,2023
Hey friends, today in this blog you’ll learn how to Password and Confirm Password Validation using HTML CSS & JavaScript. In the earlier blog, I have shared how to check Email Validation using JavaScript and now I’m going to create a form to check the password and confirm password validation.
You may have seen the password and confirm password fields on the most of signup forms. Confirm password field is required to include when creating a password. It is because a password field hides the user’s input.
If users mistype their password, they won’t recognize it. The confirm password catches types by helping users to type their passwords twice. By using this confirm password field there is less or no chance to mistype passwords by users.
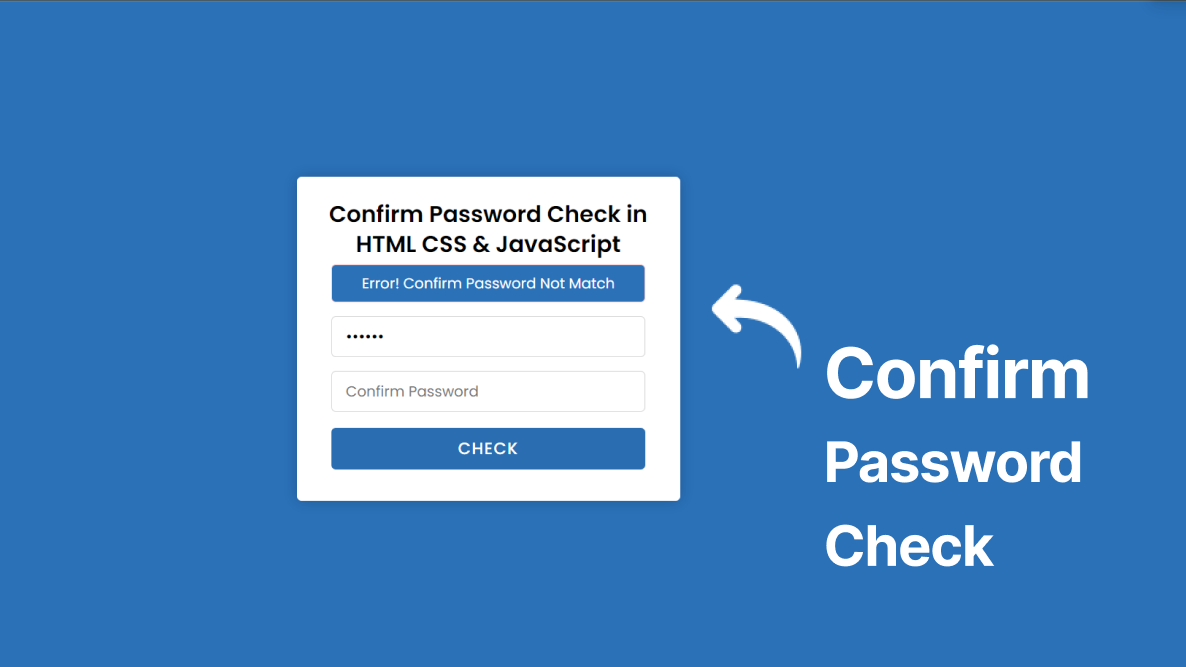
In our program Password and Confirm Password Validation, at first, there is a white container on the webpage and inside this container, there is a title, two input fields, and a check button. When you enter some characters on those password fields and click on the check
Throughout the post, we’ll also explore different HTML tags and CSS properties that will help us efficiently create our Amazon-inspired homepage. To keep it beginner-friendly, we’ll use tags like nav, sections, divs, inputs, links, footer, and other commonly used tags.
Confirm Password Check using JavaScript [Source Codes]
To create this program Confirm Password Validation in HTML & JavaScript. First, you need to create two Files one HTML File and another one is CSS File. After creating these files just paste the following codes into your file.
First, create an HTML file with the name of index.html and paste the given codes in your HTML file. Remember, you’ve to create a file with .html extension.
<!DOCTYPE html>
<!-- Coding By Letscodeweb -->
<html lang="en" dir="ltr">

<head>
    <meta charset="utf-8">
    <title>Confirm Password Check | CodingNepal</title>
    <link rel="stylesheet" href="style.css">
</head>

<body>
    <div class="container">
        <header>Confirm Password Check in <br>HTML CSS & JavaScript</header>
        <form action="#">
            <div class="error-text"></div>
            <div class="field">
                <input onkeyup="active()" id="pswrd_1" type="password" placeholder="Enter Password">
            </div>
            <div class="field">
                <input onkeyup="active_2()" id="pswrd_2" disabled type="password" placeholder="Confirm Password">
                <div class="show">
                    SHOW
                </div>
            </div>
            <button disabled>Check</button>
        </form>
    </div>
    <script>
        const pswrd_1 = document.querySelector("#pswrd_1");
        const pswrd_2 = document.querySelector("#pswrd_2");
        const errorText = document.querySelector(".error-text");
        const showBtn = document.querySelector(".show");
        const btn = document.querySelector("button");
        function active() {
            if (pswrd_1.value.length >= 6) {
                btn.removeAttribute("disabled", "");
                btn.classList.add("active");
                pswrd_2.removeAttribute("disabled", "");
            } else {
                btn.setAttribute("disabled", "");
                btn.classList.remove("active");
                pswrd_2.setAttribute("disabled", "");
            }
        }
        btn.onclick = function () {
            if (pswrd_1.value != pswrd_2.value) {
                errorText.style.display = "block";
                errorText.classList.remove("matched");
                errorText.textContent = "Error! Confirm Password Not Match";
                return false;
            } else {
                errorText.style.display = "block";
                errorText.classList.add("matched");
                errorText.textContent = "Nice! Confirm Password Matched";
                return false;
            }
        }
        function active_2() {
            if (pswrd_2.value != "") {
                showBtn.style.display = "block";
                showBtn.onclick = function () {
                    if ((pswrd_1.type == "password") && (pswrd_2.type == "password")) {
                        pswrd_1.type = "text";
                        pswrd_2.type = "text";
                        this.textContent = "Hide";
                        this.classList.add("active");
                    } else {
                        pswrd_1.type = "password";
                        pswrd_2.type = "password";
                        this.textContent = "Show";
                        this.classList.remove("active");
                    }
                }
            } else {
                showBtn.style.display = "none";
            }
        }
    </script>
</body>

</html>
Second, create a CSS file with the name of style.css and paste the given codes in your CSS file. Remember, you’ve to create a file with .css extension.
@import url('https://fonts.googleapis.com/css?family=Poppins:400,500,600,700&display=swap');
*{
margin: 0;
padding: 0;
box-sizing: border-box;
font-family: 'Poppins', sans-serif;
}
html,body{
display: grid;
height: 100%;
place-items: center;
text-align: center;
background: #f2f2f2;
}
.container{
background: #fff;
padding: 20px 30px;
width: 420px;
border-radius: 5px;
box-shadow: 0 0 15px rgba(0,0,0,0.2);
}
.container header{
padding-top: 5px;
font-size: 25px;
font-weight: 600;
line-height: 33px;
}
.container form{
margin: 5px 8px;
}
.container form .error-text{
background: #F8D7DA;
padding: 8px 0;
border-radius: 5px;
color: #8B3E46;
border: 1px solid #F5C6CB;
display: none;
}
.container form .error-text.matched{
background: #D4EDDA;
color: #588C64;
border-color: #C3E6CB;
}
.container form .field{
width: 100%;
height: 45px;
display: flex;
margin: 15px 0;
position: relative;
}
form .field input{
width: 100%;
height: 100%;
border: 1px solid lightgrey;
padding-left: 15px;
outline: none;
border-radius: 5px;
font-size: 17px;
transition: all 0.3s;
}
form .field input::placeholder{
font-size: 16px;
}
form .field input:focus{
border-color: #27ae60;
box-shadow: inset 0 0 3px #2fd072;
}
form .field .show{
position: absolute;
right: 10px;
top: 50%;
transform: translateY(-50%);
font-size: 14px;
font-weight: 600;
user-select: none;
cursor: pointer;
display: none;
}
form .field .show.active{
color: #27ae60;
}
form button{
width: 100%;
height: 45px;
margin: 3px 0 10px 0;
border: none;
outline: none;
background: #27ae60;
border-radius: 5px;
color: #fff;
font-size: 18px;
font-weight: 500;
letter-spacing: 1px;
text-transform: uppercase;
cursor: no-drop;
opacity: 0.7;
}
form button.active{
cursor: pointer;
opacity: 1;
transition: all 0.3s;
}
form button.active:hover{
background: #219150;
}
Conclusion and Final Words
That’s all, now you’ve successfully created a Password and Confirm Password Validation in HTML CSS & JavaScript. If your code doesn’t work or you’ve faced any error/problem then please download the source code files from the given download button. It’s free and a .zip file will be downloaded then you’ve to extract it.

Most Popular


Recent Posts
-

Image Slider in HTML CSS and JavaScript
Letscode - October 4,2023
-

Facebook Login Page Using HTML & CSS
Letscode - October 10,2023
-

Amazon Website clone in HTML & CSS
Letscode - November 4,2023
-

Custom Captcha Generator in HTML CSS and JS
Letscode - October 24,2023