Drag and Drop Sortable List using HTML CSS & JavaScript
by Letscode - October 4,2023
Drag and drop sortable lists are a widely used UI element allowing users to reorder items by dragging and dropping them on a desired position. This functionality can be found in many web applications, like task managers and e-commerce websites.
In this blog post, you’ll learn how to create Drag and Drop Sortable Lists using HTML, CSS, and JavaScript. Remember, we’ll not use any external JavaScript library to create this sortable list, so you’ll get a deeper understanding of DOM manipulation, event handling, array manipulation, and more.
Steps For Creating Drag & Drop Sortable List JavaScript
To create a drag and drop sortable list using HTML, CSS, and JavaScript, follow the given steps line by line:
- Create a folder. You can name this folder whatever you want, and inside this folder, create the mentioned files.
- Create an index.html file. The file name must be index and its extension .html
- Create a style.css file. The file name must be style and its extension .css
- Create a script.js file. The file name must be script and its extension .js
- Download the images folder from Google Drive and put this folder inside the project folder.
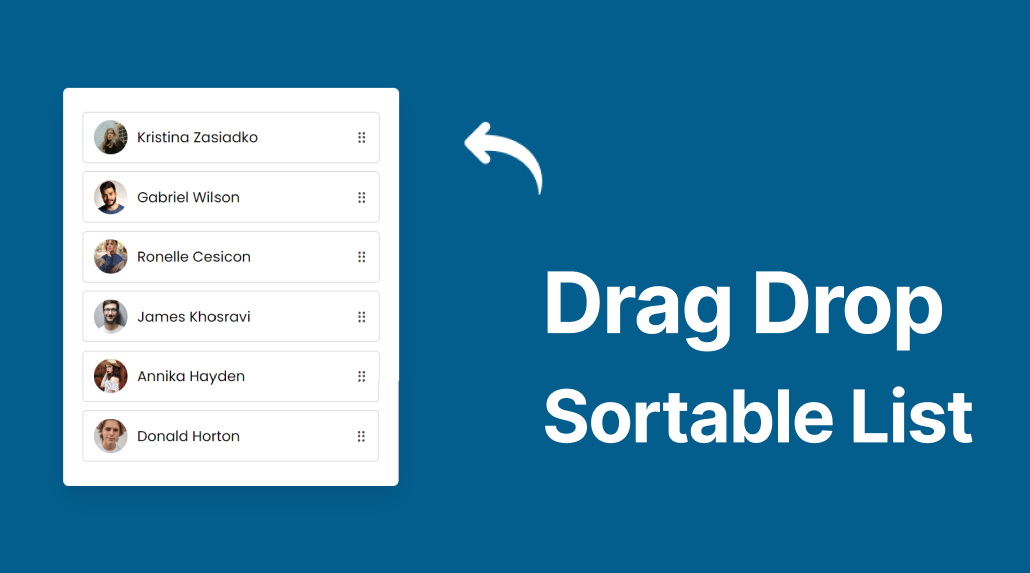
To start, add the following HTML codes to your index.html file to create the draggable, sortable list items: I’ve added six list items, but you can add as many as you want.
<!DOCTYPE html>
<!-- Coding By Letscodeweb - youtube.com/@Letscodeweb -->
<html lang="en" dir="ltr">

<head>
    <meta charset="utf-8">
    <title>Drag and Drop Sortable List | Letscodeweb</title>
    <link rel="stylesheet" href="style.css">
    <meta name="viewport" content="width=device-width, initial-scale=1.0">
    <link rel="stylesheet" href="https://unicons.iconscout.com/release/v4.0.0/css/line.css">
    <script src="script.js" defer></script>
</head>

<body>
    <ul class="sortable-list">
        <li class="item" draggable="true">
            <div class="details">
                <img src="images/img-1.jpg">
                <span>Kristina Zasiadko</span>
            </div>
            <i class="uil uil-draggabledots"></i>
        </li>
        <li class="item" draggable="true">
            <div class="details">
                <img src="images/img-2.jpg">
                <span>Gabriel Wilson</span>
            </div>
            <i class="uil uil-draggabledots"></i>
        </li>
        <li class="item" draggable="true">
            <div class="details">
                <img src="images/img-3.jpg">
                <span>Ronelle Cesicon</span>
            </div>
            <i class="uil uil-draggabledots"></i>
        </li>
        <li class="item" draggable="true">
            <div class="details">
                <img src="images/img-4.jpg">
                <span>James Khosravi</span>
            </div>
            <i class="uil uil-draggabledots"></i>
        </li>
        <li class="item" draggable="true">
            <div class="details">
                <img src="images/img-5.jpg">
                <span>Annika Hayden</span>
            </div>
            <i class="uil uil-draggabledots"></i>
        </li>
        <li class="item" draggable="true">
            <div class="details">
                <img src="images/img-6.jpg">
                <span>Donald Horton</span>
            </div>
            <i class="uil uil-draggabledots"></i>
        </li>
    </ul>

</body>

</html>
Second, paste the following codes into your style.css file.
/* Import Google font - Poppins */
@import url('https://fonts.googleapis.com/css2?family=Poppins:wght@400;500;600&display=swap');

* {
  margin: 0;
  padding: 0;
  box-sizing: border-box;
  font-family: 'Poppins', sans-serif;
}

body {
  display: flex;
  align-items: center;
  justify-content: center;
  min-height: 100vh;
  background: #035e8e;
}

.sortable-list {
  width: 425px;
  padding: 25px;
  background: #fff;
  border-radius: 7px;
  padding: 30px 25px 20px;
  box-shadow: 0 15px 30px rgba(0, 0, 0, 0.1);
}

.sortable-list .item {
  list-style: none;
  display: flex;
  cursor: move;
  background: #fff;
  align-items: center;
  border-radius: 5px;
  padding: 10px 13px;
  margin-bottom: 11px;
  /* box-shadow: 0 2px 4px rgba(0,0,0,0.06); */
  border: 1px solid #ccc;
  justify-content: space-between;
}

.item .details {
  display: flex;
  align-items: center;
}

.item .details img {
  height: 43px;
  width: 43px;
  pointer-events: none;
  margin-right: 12px;
  object-fit: cover;
  border-radius: 50%;
}

.item .details span {
  font-size: 1.13rem;
}

.item i {
  color: #474747;
  font-size: 1.13rem;
}

.item.dragging {
  opacity: 0.6;
}

.item.dragging :where(.details, i) {
  opacity: 0;
}
Third, paste the following codes into your script.js file.
const sortableList = document.querySelector(".sortable-list");
const items = sortableList.querySelectorAll(".item");

items.forEach(item => {
    item.addEventListener("dragstart", () => {
        // Adding dragging class to item after a delay
        setTimeout(() => item.classList.add("dragging"), 0);
    });
    // Removing dragging class from item on dragend event
    item.addEventListener("dragend", () => item.classList.remove("dragging"));
});

const initSortableList = (e) => {
    e.preventDefault();
    const draggingItem = document.querySelector(".dragging");
    // Getting all items except currently dragging and making array of them
    let siblings = [...sortableList.querySelectorAll(".item:not(.dragging)")];

    // Finding the sibling after which the dragging item should be placed
    let nextSibling = siblings.find(sibling => {
        return e.clientY <= sibling.offsetTop + sibling.offsetHeight / 2;
    });

    // Inserting the dragging item before the found sibling
    sortableList.insertBefore(draggingItem, nextSibling);
}

sortableList.addEventListener("dragover", initSortableList);
sortableList.addEventListener("dragenter", e => e.preventDefault());
It’s important to note that the script code for creating the drag and drop sortable list will only work on devices with a mouse. If you want to enable touch functionality, you’ll need to add touch event listeners as well.
If you’re not familiar with touch event listeners and want to learn more about how to use them, you can check out this blog post on creating a draggable image slider using touch event listeners in JavaScript. It will help you understand how to add dragging functionality to touch devices.
Conclusion and Final Words
By following the steps in this blog post, you have successfully created Drag and Drop Sortable List using HTML, CSS, and JavaScript. Now it’s up to you to modify the code to suit your needs and make it more touch-friendly.
If you encounter any problems or your code is not working as expected, you can download the source code files of this project for free. Click on the download button to get the zip file containing the project folder with source code files.

Most Popular


Recent Posts
-

Image Slider in HTML CSS and JavaScript
Letscode - October 4,2023
-

Facebook Login Page Using HTML & CSS
Letscode - October 10,2023
-

Amazon Website clone in HTML & CSS
Letscode - November 4,2023
-

Custom Captcha Generator in HTML CSS and JS
Letscode - October 24,2023