Login & Registration Form in HTML CSS & JavaScript
by Letscode - October 4,2023
Creating a login and registration form is a common task for developers, as it is a fundamental aspect of many web applications. As a developer, learning to create these forms can help you become more proficient in developing & designing.
A login form is a type of form that allows users to enter their credentials (such as a username and password) to gain access to a protected area of a website or application. A registration form, also known as a sign-up form, is a type of form that allows users to create an account on a website or application.
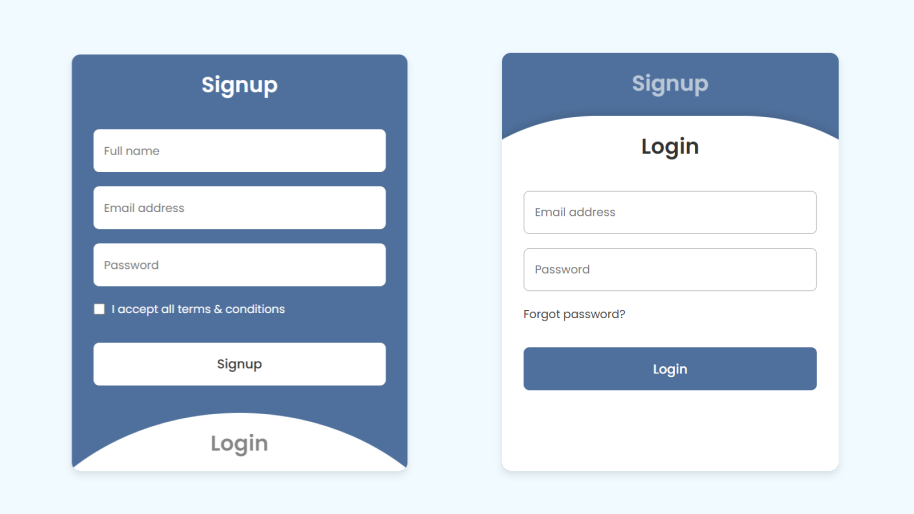
Today in this blog you will learn how to create a responsive Login & Registration Form in HTML CSS & JavaScript. The blog will cover everything from the basics of creating a Login & Registration in HTML, to styling it with CSS and adding with JavaScript. Recently I have provided a blog on Button Click Animation, I hope you will find this blog helpful as well.
Steps to Create Login & Registration Form
We will create this Login & Registration Form in two steps:
- File Structure of the Project
- Creating Login & Registration From
- 1. File Structure of the Project
- 2. Creating Button Click Animation
To build this Login & Registration Form, we’ll be using two separate files – index.html and style.css. These files will contain the HTML, CSS, and JavaScript code respectively needed to bring the Login & Registration Form. Let’s get started by setting up these files and adding the basic code. Once you have made these files, you can proceed to the next step of creating your Button Click Animation.
In the second step, we will design the user interface for our Login & Registration Form and style it using HTML and CSS. Once the user interface is complete, we will use JavaScript to animate these two forms on click.
In the index.html file, add the following HTML and JavaScript code to create the basic structure of the animated button.
<!DOCTYPE html>
<!-- Coding By letscodeweb-->
<html lang="en">

<head>
    <meta charset="UTF-8" />
    <meta http-equiv="X-UA-Compatible" content="IE=edge" />
    <meta name="viewport" content="width=device-width, initial-scale=1.0" />
    <title>Login & Signup Form - letscodeweb</title>
    <link rel="stylesheet" href="style.css" />
</head>

<body>
    <section class="wrapper">
        <!-- Signup Form HTML  -->
        <div class="form signup">
            <header>Signup</header>
            <form action="#">
                <input type="text" placeholder="Full name" required />
                <input type="text" placeholder="Email address" required />
                <input type="password" placeholder="Password" required />
                <div class="checkbox">
                    <input type="checkbox" id="signupCheck" />
                    <label for="signupCheck">I accept all terms & conditions</label>
                </div>
                <input type="submit" value="Signup" />
            </form>
        </div>
        <!-- Login Form HTML  -->
        <div class="form login">
            <header>Login</header>
            <form action="#">
                <input type="text" placeholder="Email address" required />
                <input type="password" placeholder="Password" required />
                <a href="#">Forgot password?</a>
                <input type="submit" value="Login" />
            </form>
        </div>
    </section>

    <!-- Simple JavaScript Section  -->

    <script>
        const wrapper = document.querySelector(".wrapper"),
            signupHeader = document.querySelector(".signup header"),
            loginHeader = document.querySelector(".login header");

        // Click Event
        loginHeader.addEventListener("click", () => {
            wrapper.classList.add("active");
        });


        signupHeader.addEventListener("click", () => {
            wrapper.classList.remove("active");
        });

    </script>
</body>

</html>
In the style.css file, add the following CSS code to add styles and make the button and its bubbles. If you want, you can change the color, background, font, and size of the button in this code.
/* Coding by Letscodeweb */
@import url("https://fonts.googleapis.com/css2?family=Poppins:wght@200;300;400;500;600;700&display=swap");

* {
    margin: 0;
    padding: 0;
    box-sizing: border-box;
    font-family: 'Poppins', sans-serif;
}

body {
    min-height: 100vh;
    display: flex;
    align-items: center;
    justify-content: center;
    background: #f0faff;
}

.wrapper {
    position: relative;
    max-width: 470px;
    width: 100%;
    border-radius: 12px;
    padding: 20px 30px 120px;
    background: #4f709c;
    box-shadow: 0 5px 10px rgba(0, 0, 0, 0.1);
    overflow: hidden;
}

.form.login {
    position: absolute;
    left: 50%;
    bottom: -86%;
    transform: translateX(-50%);
    width: calc(100% + 220px);
    padding: 20px 140px;
    border-radius: 50%;
    height: 100%;
    background: #fff;
    transition: all 0.6s ease;
}

.wrapper.active .form.login {
    bottom: -15%;
    border-radius: 35%;
    box-shadow: 0 -5px 10px rgba(0, 0, 0, 0.1);
}

.form header {
    font-size: 30px;
    text-align: center;
    color: #fff;
    font-weight: 600;
    cursor: pointer;
}

.form.login header {
    color: #333;
    opacity: 0.6;
}


.wrapper.active .form.login header {
    opacity: 1;
}

.wrapper.active .signup header {
    opacity: 0.6;
}

.wrapper form {
    display: flex;
    flex-direction: column;
    gap: 20px;
    margin-top: 40px;
}

form input {
    height: 60px;
    outline: none;
    border: none;
    padding: 0 15px;
    font-size: 16px;
    font-weight: 600;
    color: #333;
    border-radius: 8px;
    background: #fff;
}

.form.login {
    border: 1px solid #aaa;
}

.form.login input:focus {
    box-shadow: 0 1px 0 #ddd;
}

form .checkbox {
    display: flex;
    align-items: center;
    gap: 10px;
}

.checkbox input[type="checkbox"] {
    height: 16px;
    width: 16px;
    accent-color: #fff;
}

form .checkbox label {
    cursor: pointer;
    color: #fff;
}


form a {
    color: #333;
    text-decoration: none;
}

form a:hover {
    text-decoration: underline;
}

form input[type="submit"] {
    margin-top: 15px;
    padding: none;
    font-size: 18px;
    font-weight: 500;
    cursor: pointer;
}

.form.login input[type="submit"] {
    background: #4f709c;
    color: #fff;
    border: none;
}
Conclusion and Final Words
By following the steps you have successfully created a Login & Registration Form. There are lots of Login and Signup Forms you can find on this website to enhance your skills in creating forms. If you found this blog helpful, please consider sharing it with others. Your support helps us continue creating valuable content and resources for the development community. Thank you for your support!
If you face any difficulties while creating your Login and Registration Form or your code is not working as expected, you can download the source code files for this Login and Signup Form for free by clicking on the download button, and you can also view a live demo of this card slider by clicking on the view live button.

Most Popular


Recent Posts
-

Image Slider in HTML CSS and JavaScript
Letscode - October 4,2023
-

Facebook Login Page Using HTML & CSS
Letscode - October 10,2023
-

Amazon Website clone in HTML & CSS
Letscode - November 4,2023
-

Custom Captcha Generator in HTML CSS and JS
Letscode - October 24,2023