Resize and Compress Images in HTML CSS & JavaScript
by Letscode - October 4,2023
Did you know that you can resize image dimensions (width & height) and compress their size by reducing the quality on the front end using vanilla JavaScript? If your answer is no then this blog is written for you.
Today, in this blog, you’ll learn How to Resize and Compress Images in HTML CSS & JavaScript from scratch. I believe the codes and logic behind resizing images will not be complicated to understand if you already have basic knowledge of JavaScript.
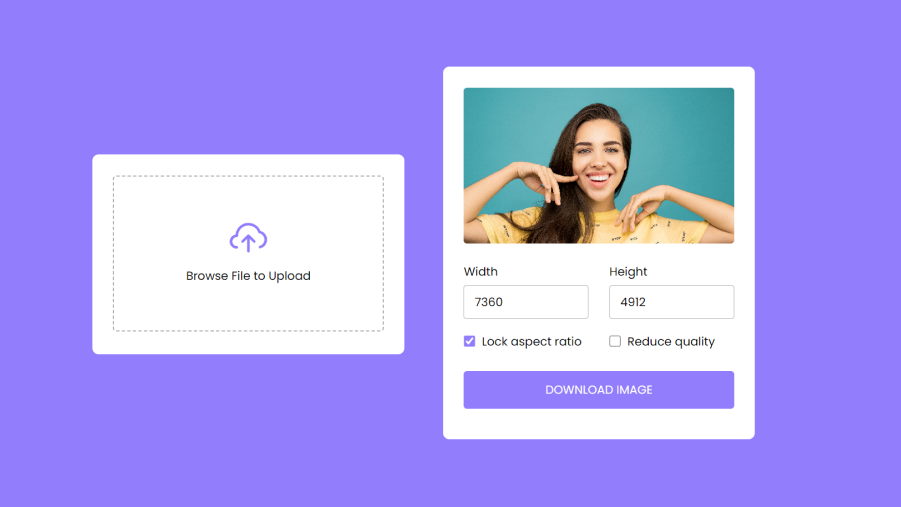
In my Image Resizer & Compressor tool, users can upload an image and resize its width & height or reduce its size. If they checked the “Lock aspect ratio”, the aspect ratio for an image will be calculated automatically and filled in the field as they start changing width or height. I believe you will also help to enhance your web development skills.
Resize and Compress Images in JavaScript [Source Codes]
To create an Image Resizer and Compressor using HTML CSS & JavaScript, follow the given steps line by line:
- Create a folder. You can put any name of this folder and create the below-mentioned files inside this folder.
- Create an index.html file. The file name must be index and its extension .html
- Create a style.css file. The file name must be style and its extension .css
- Create a script.js file. The file name must be script and its extension .js
First, paste the following codes into your index.html file.
<!DOCTYPE html>
<!-- Coding By letscodeweb - youtube.com/@letscodeweb -->
<html lang="en" dir="ltr">

<head>
    <meta charset="utf-8">
    <title>Image Resizer JavaScript | Letscodeweb</title>
    <link rel="stylesheet" href="style.css">
    <meta name="viewport" content="width=device-width, initial-scale=1.0">
    <script src="script.js" defer></script>
</head>

<body>
    <div class="wrapper">
        <div class="upload-box">
            <input type="file" accept="image/*" hidden>
            <img src="upload-icon.svg" alt="">
            <p>Browse File to Upload</p>
        </div>
        <div class="content">
            <div class="row sizes">
                <div class="column width">
                    <label>Width</label>
                    <input type="number">
                </div>
                <div class="column height">
                    <label>Height</label>
                    <input type="number">
                </div>
            </div>
            <div class="row checkboxes">
                <div class="column ratio">
                    <input type="checkbox" id="ratio" checked>
                    <label for="ratio">Lock aspect ratio</label>
                </div>
                <div class="column quality">
                    <input type="checkbox" id="quality">
                    <label for="quality">Reduce quality</label>
                </div>
            </div>
            <button class="download-btn">Download Image</button>
        </div>
    </div>

</body>

</html>
Second, paste the following codes into your style.css file.
/* Import Google font - Poppins */
@import url('https://fonts.googleapis.com/css2?family=Poppins:wght@400;500;600&display=swap');

* {
  margin: 0;
  padding: 0;
  box-sizing: border-box;
  font-family: 'Poppins', sans-serif;
}

body {
  display: flex;
  align-items: center;
  justify-content: center;
  min-height: 100vh;
  background: #927DFC;
}

.wrapper {
  width: 450px;
  height: 288px;
  padding: 30px;
  background: #fff;
  border-radius: 9px;
  transition: height 0.2s ease;
}

.wrapper.active {
  height: 537px;
}

.wrapper .upload-box {
  height: 225px;
  display: flex;
  cursor: pointer;
  align-items: center;
  justify-content: center;
  flex-direction: column;
  border-radius: 5px;
  border: 2px dashed #afafaf;
}

.wrapper.active .upload-box {
  border: none;
}

.upload-box p {
  font-size: 1.06rem;
  margin-top: 20px;
}

.wrapper.active .upload-box p {
  display: none;
}

.wrapper.active .upload-box img {
  width: 100%;
  height: 100%;
  object-fit: cover;
  border-radius: 5px;
}

.wrapper .content {
  opacity: 0;
  margin-top: 28px;
  pointer-events: none;
}

.wrapper.active .content {
  opacity: 1;
  pointer-events: auto;
  transition: opacity 0.5s 0.05s ease;
}

.content .row {
  display: flex;
  justify-content: space-between;
}

.content .row .column {
  width: calc(100% / 2 - 15px);
}

.row .column label {
  font-size: 1.06rem;
}

.sizes .column input {
  width: 100%;
  height: 49px;
  outline: none;
  margin-top: 7px;
  padding: 0 15px;
  font-size: 1.06rem;
  border-radius: 4px;
  border: 1px solid #aaa;
}

.sizes .column input:focus {
  padding: 0 14px;
  border: 2px solid #927DFC;
}

.content .checkboxes {
  margin-top: 20px;
}

.checkboxes .column {
  display: flex;
  align-items: center;
}

.checkboxes .column input {
  width: 17px;
  height: 17px;
  margin-right: 9px;
  accent-color: #927DFC;
}

.content .download-btn {
  width: 100%;
  color: #fff;
  outline: none;
  border: none;
  cursor: pointer;
  font-size: 1.06rem;
  border-radius: 5px;
  padding: 15px 0;
  margin: 30px 0 10px;
  background: #927DFC;
  text-transform: uppercase;
}
Third, paste the following codes into your script.js file.
const uploadBox = document.querySelector(".upload-box"),
previewImg = uploadBox.querySelector("img"),
fileInput = uploadBox.querySelector("input"),
widthInput = document.querySelector(".width input"),
heightInput = document.querySelector(".height input"),
ratioInput = document.querySelector(".ratio input"),
qualityInput = document.querySelector(".quality input"),
downloadBtn = document.querySelector(".download-btn");

let ogImageRatio;

const loadFile = (e) => {
    const file = e.target.files[0];
    if(!file) return;
    previewImg.src = URL.createObjectURL(file);
    previewImg.addEventListener("load", () => {
        widthInput.value = previewImg.naturalWidth;
        heightInput.value = previewImg.naturalHeight;
        ogImageRatio = previewImg.naturalWidth / previewImg.naturalHeight;
        document.querySelector(".wrapper").classList.add("active");
    });
}

widthInput.addEventListener("keyup", () => {
    const height = ratioInput.checked ? widthInput.value /
     ogImageRatio : heightInput.value;
    heightInput.value = Math.floor(height);
});

heightInput.addEventListener("keyup", () => {
    const width = ratioInput.checked ? heightInput.value *
     ogImageRatio : widthInput.value;
    widthInput.value = Math.floor(width);
});

const resizeAndDownload = () => {
    const canvas = document.createElement("canvas");
    const a = document.createElement("a");
    const ctx = canvas.getContext("2d");

    const imgQuality = qualityInput.checked ? 0.5 : 1.0;

    canvas.width = widthInput.value;
    canvas.height = heightInput.value;

    ctx.drawImage(previewImg, 0, 0, canvas.width, canvas.height);

    a.href = canvas.toDataURL("image/jpeg", imgQuality);
    a.download = new Date().getTime(); // passing current time as download value
    a.click(); // clicking <a> element so the file download
}

downloadBtn.addEventListener("click", resizeAndDownload);
fileInput.addEventListener("change", loadFile);
uploadBox.addEventListener("click", () => fileInput.click());
That’s all, now you’ve successfully created a Calculator. If you face any difficulties while creating your calculator or your code is not working as expected, you can download the source code files for this calculator for free by clicking on the download button, and you can also view a live demo of this card slider by clicking on the view live button.

Most Popular


Recent Posts
-

Image Slider in HTML CSS and JavaScript
Letscode - October 4,2023
-

Facebook Login Page Using HTML & CSS
Letscode - October 10,2023
-

Amazon Website clone in HTML & CSS
Letscode - November 4,2023
-

Custom Captcha Generator in HTML CSS and JS
Letscode - October 24,2023